The world's been reprapped,
there are many delta's now,
but this one is mine.
This is part 1 in (hopefully) a long series of posts on designing/building my new delta design, which is super long overdue. I started thinking about building a new delta machine almost immediately after I build my Rostock MAX, when Misumi offered a $150 credit through Reddit in March, 2014. Without knowing much of anything (I had done next to no research at that point), I ordered a bunch of 1515 extrusions and other bits and pieces. In the later months, I picked up a set of steppers (via Massdrop), an Azteeg X5 (based on a suggestion in one of the forums I read), and various other bits and pieces. Including my initial Rostock MAX purpose, I think I've put in about $2.5k into 3d-printing-related items, so it hasn't been a cheap hobby, though I guess there are also much more expensive novelties. For all that, I have naught to show =P. This should change!
My plan is to also include a review of the existing designs and alternative options for each component of the 3D printer, so hopefully others can also use my posts as a resource for their own designs. For the past year, I've mostly been just reading and re-reading notes about different designs and whatnot:
- random set of design notes for a delta printer
- old list of existing deslta designs that I've liked
- past post on how I'd like to improve on the Rostock MAX
Existing Frame Designs
One of the appealing aspects of deltas is their relatively low part count and minimalist design. Most designs that I've found tend to mimic the basic Kossel or original Rostock design, with 3 main towers and triangular-ish bases. Variations like the Kossel Clear and Rostock MAX replace the printed components with laser-cut brackets and sub-assemblies. For both hobbyists who're starting out in the RepRap movement and upstart companies who're just trying to make a profit, the basic simplicity of these designs is a big plus. However, they're rather limited in terms of structural stiffness (the frames are susceptible to twist), and they make enclosures difficult to install. Other well-known, similar variants include Richrap's 3DR and Cerberus, which simplified the design even further and proposed tendons to replace belts. Plenty of other examples (ie. Cherry-pi, Delta-pi) can also be referenced, but they more or less have the same frame layout.
To improve structural stability, some companies, like Atom replace the printed parts with machined components, while others, like DeltaMaker use wider extrusions while still maintaining the same general layout. I've only managed to find proper enclosures on much more expensive machines, like the Spiderbot, which seems a little ridiculous to me given how susceptible taller, larger prints are to drafts. For me, I'd prefer a design that avoids any sort of custom machining and still uses reasonably affordable, off-the-shelf parts, while improving upon the performance of current RepRap delta designs.
Towards a Hexagon Profile
In looking at documented printer designs, I eventually ran across some variations with hexagonal, as opposed to triangular, bases. The DeltaMaker is somewhat hexagonal itself by using wider tower beams. I think these better accommodate integrated enclosures and improve stiffness in taller designs, if only as a result of requiring more beams in its construction. My frame borrows heavily from the following:
- Richrap's 3DRmega: The bigger, badder cousin of Richrap's 3DR design. Despite the much larger size, I think the connectors/brackets are very similar to the basic Kossel designs. It was a little interesting to see how he changed some of the part designs to avoid warping during prints (due to their size) and to minimize the massive print time.
- DeltaStar: I really appreciated the detailed image documentation for this design! This was probably the first design I found that I felt was built with an enclosure in mind. I also liked how the power supply and controller boards are mounted outside but still looks neatly packaged. One of the frustrations I have with the Rostock MAX is how difficult it is to change or fix the wiring. (EDIT: Didn't realize at the time, but the creator is also the same guy behind a printable robot arm project that I'm a huge fan of)
- Project Hexagon: Very similar structurally to DeltaStar, this design comes from a maker space in Karlsruhe. Actual photos of the setup are pretty limited, but some of the renderings suggest storing the electronics and power supply just below the top as opposed to the side or underneath.
- EDIT: d3delta3d: My delta ended up sharing quite a few similarities with this DeltaMaker-like printer I found after the fact. This has 3 main supports, but the overall frame is more hexagonal, and the author (who hopefully will finish documenting his really clean build) also introduces a couple of extra components/features that I haven't seen elsewhere.
Result
(For better or for worse, I committed myself to using Onshape for the entire design. I'll detail my thoughts regarding the program once I finish this design in its entirety)
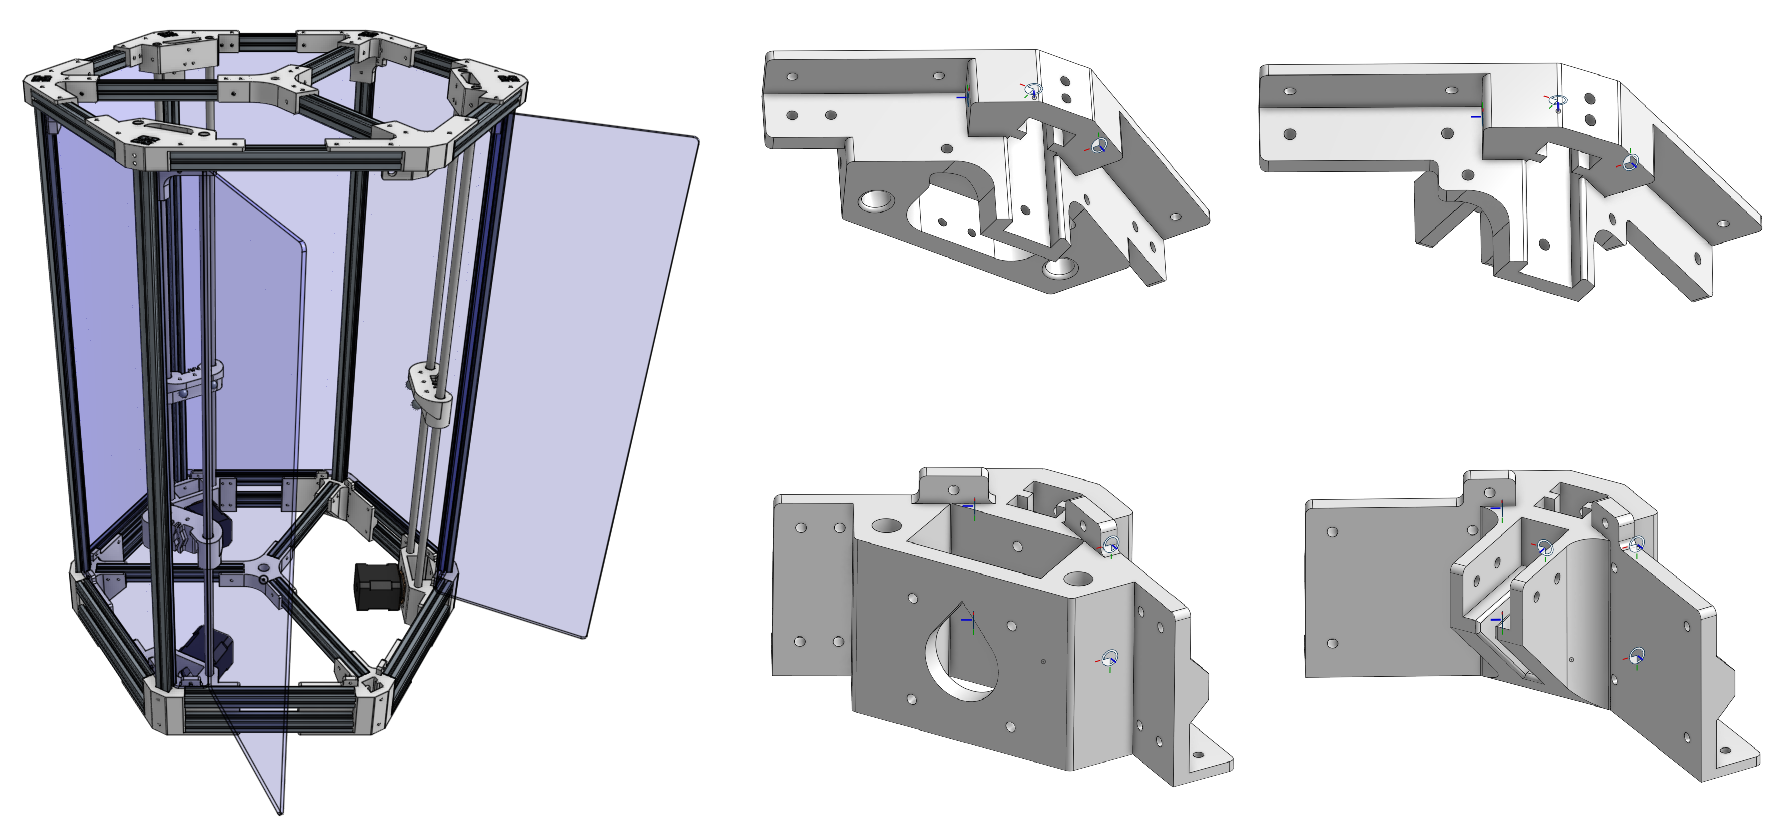
I didn't stray too far from the hexagonal designs mentioned above. A Kossel-esque design with printed brackets and 1515 beams made the most sense to me, and to be honest, it was probably the only way I'd use up the components from my Misumi purchase. I focused on making the brackets printable w/o support and also such that warping would be minimized by limiting variations in wall/feature thickness. The 1515 extrusions make it a lot easier to mount additional plates or brackets to support extra items, so I plan on doing that with laser-cut plates to cover up some of the smaller gaps. Each of the major brackets have mounts for large, acrylic side panels, similar to how I built the enclosure for my Rostock MAX. To provide a sufficient opening, there are only 5 tower beams, and 2 of the side panels will actually serve as the primary door.
I made an early decision to go with rods and linear bearings instead of wheeled carriages or linear rails, so that actually helped out a lot with any potential issues with clearances. Having the 3 additional support beams on the top and bottom also makes it easier to seal the top and bottom with smaller panels instead of needing to invest in a large, cut plate. Hopefully that would help to minimize the overall cost at the end of the day.
At this point, my main concern is whether or not I made the brackets tall enough to properly support the 1515 beams and linear rods. I've read of many instances of builders extending the height of the original Kossel design to avoid frame bending/distortion at high print speeds. The extra beams should definitely help here, though the larger number of parts also may make alignment and leveling trickier during the build. We'll see!
Update! (2015-06-05)
Printing these brackets have taken a lot longer than I thought, especially since I'm taking it rather slow (single corner at a time, 50-70% infill, 35-45 mm/s on outer perimeter, no faster than 80 mm/s on infill), had to get a new spool of filament, and I've had some issues with edges peeling up on my Rostock MAX. After printing my first set, I made a few minor changes to make the side-frame connections more robust and also decreased the overall corner height (since my initial height selection was rather arbitrary). My biggest concern hasn't changed: I really don't know how robust these corners will be, and whether or not they'll hold up over time. Interestingly (for me) enough, it looks like a lot of Chinese vendors are now offering metal versions of the Kossel corners for sale. Maybe not too surprising, given that the most professional-looking delta I've seen from a Chinese vendor is essentially a Kossel Mini clone.


Update! (2015-06-19)
Turns out I made some very n00b mistakes right from the start. I totally forgot that somewhere down the line, I adjusted the side lengths in my CAD to 170mm, instead of the 240mm that I had on hand. So I first put the frame together with 240mm extrusions, ending up with a much wider frame than I originally intended. I didn't pick up on this until I was measuring clearances for my power supply bracket and couldn't get my measurements to match. Even with the shorter extrusions, the overall base profile will accommodate up to the 310mm diameter Rostock MAX build plate, though my earlier kinematic analysis suggests that we wouldn't be able to fully utilize the build plate.
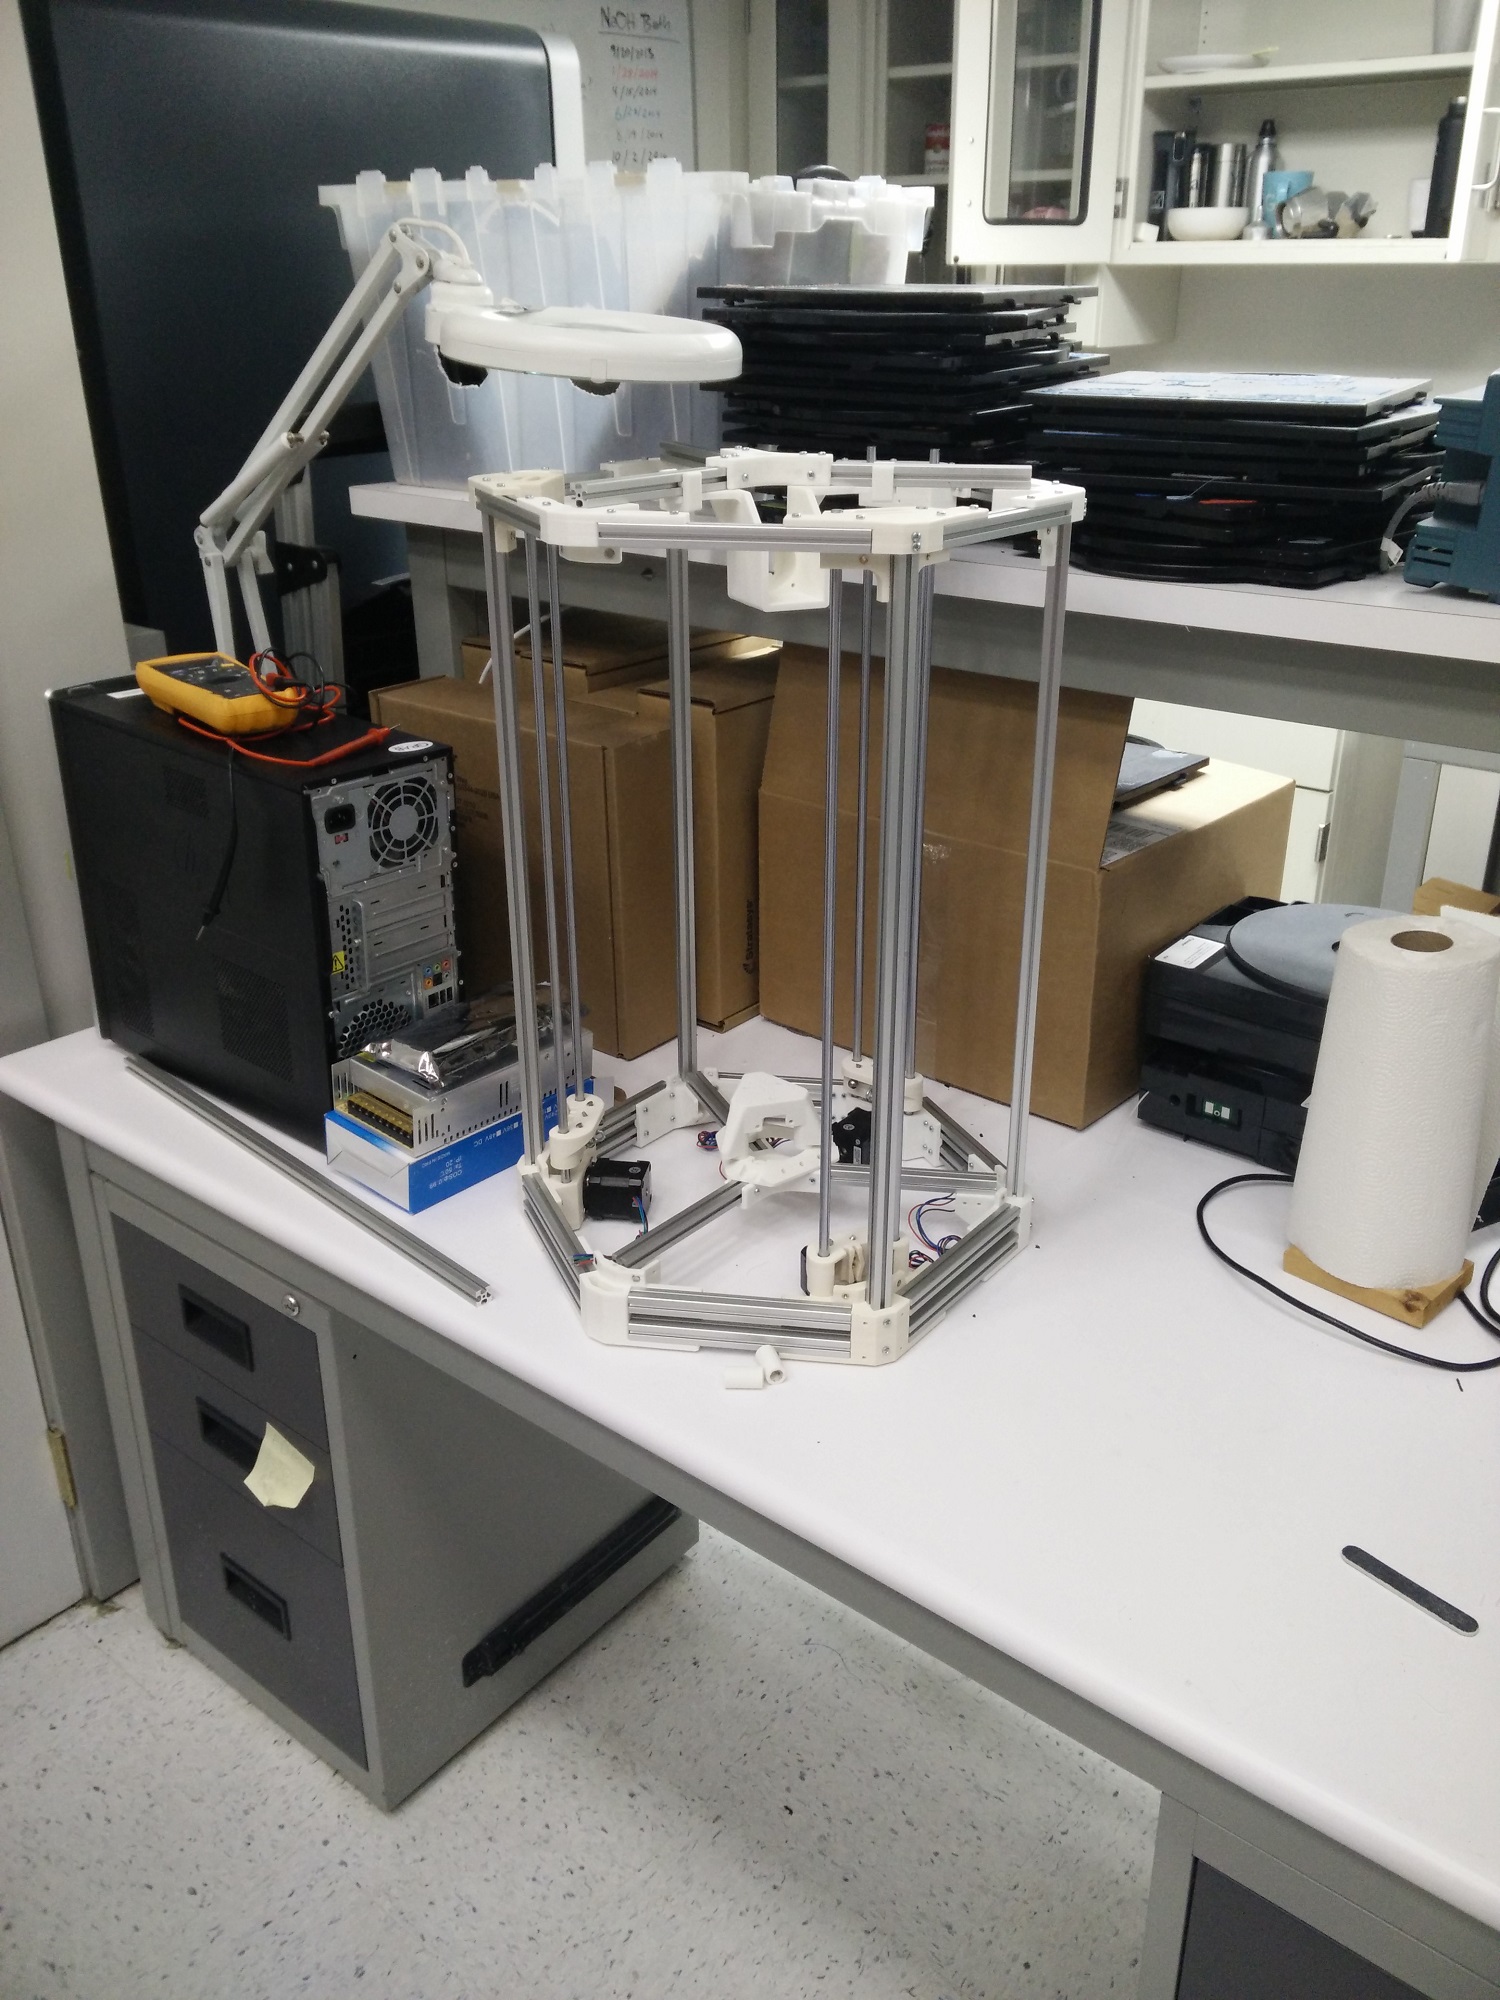
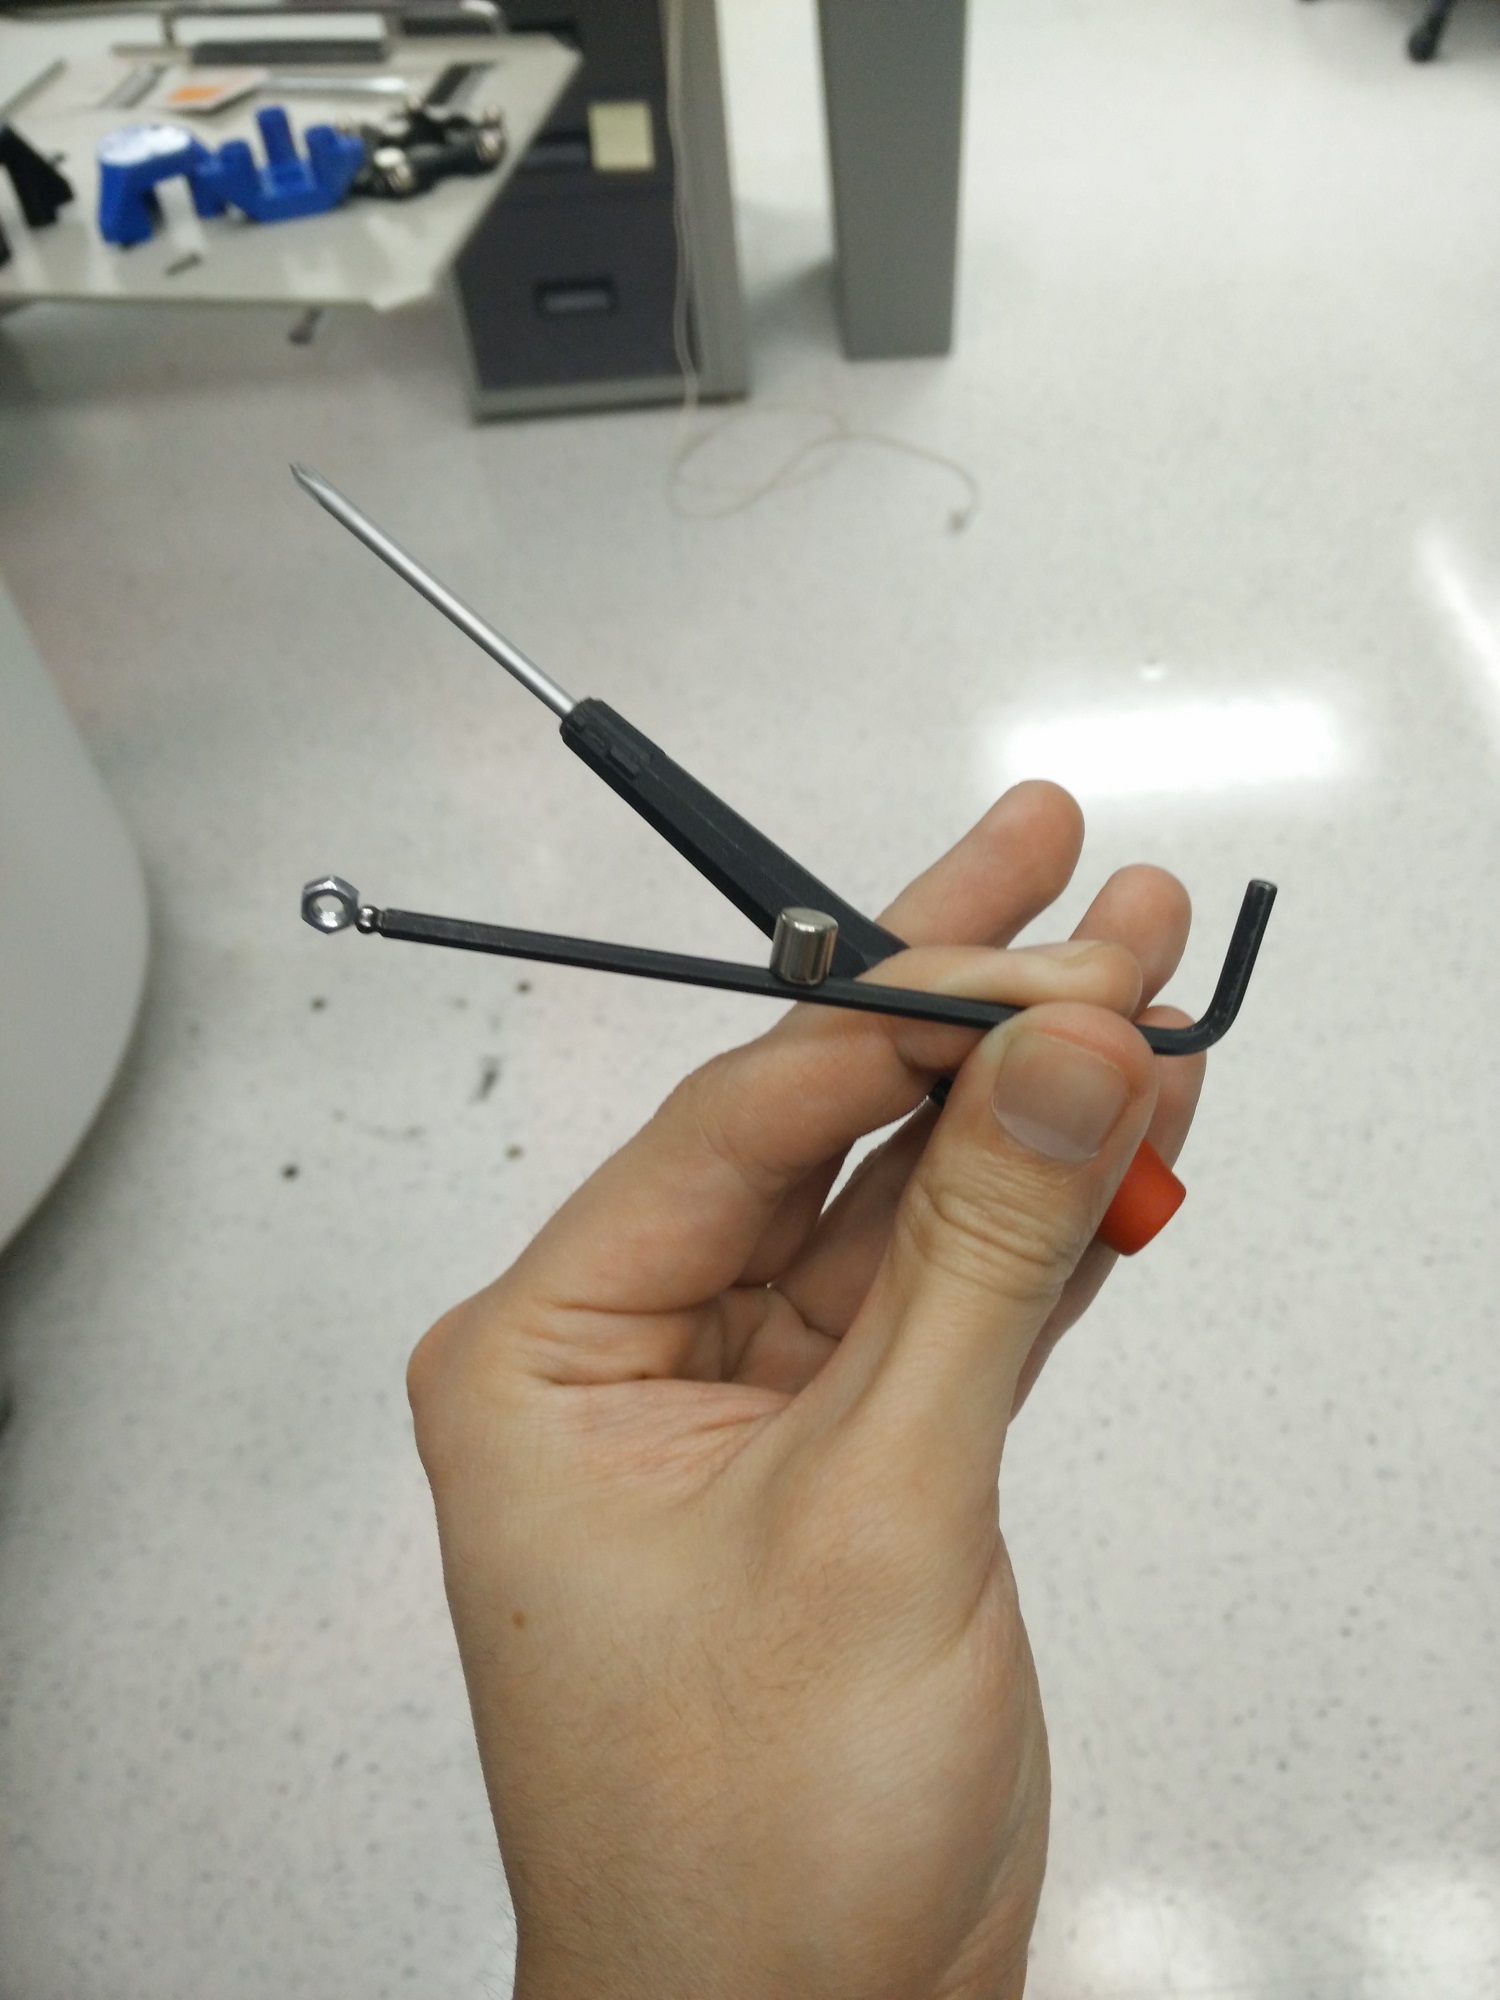
It's possible that I may have overdone it on the number of fasteners needed to put the thing together. I wanted to ensure that for each piece, there were plenty of bolts that were orthogonal to the primary loading direction, since I couldn't find lock-nuts that would fit in the 1515 extrusion. I went through an entire pack of 100 hex nuts before getting the entire frame together, which was more than a little frustrating. Allen wrenches and magnets in combination were my preferred way of assembling all the components:
A soft mallet helped a lot in press-fitting the extrusions and linear rods into the corner parts. I preferred a tight fit that requires a bit of elbow grease to assemble than a loose fit where I may need to add extra fasteners to fully constrain everything. I also discovered (a little too late) that all printed parts with press-fit features should have clearances to accommodate disassembly afterwards. Otherwise, adding extra hex nuts for additional features and add-ons would be absolutely excruciating. I'm already at the point where I really can't remove the linear rods and vertical extrusions from the corners anymore. Otherwise, the assembly's tedious but still very straightforward. There weren't any critical surprises along the way.