Let's make it better,
We have the technology,
Hope we don't mess up
The accessibility of custom upgrades is probably my favorite aspect of the DIY/maker movement. As I wrote before, I mainly got the Rostock MAX to experiment with pushing the limits of hobby/desktop 3D printers, so I've been trying to implement all the available hacks I could find:
Alternative Slicers
By default, Slic3r is the suggested slicer, as it's directly integrated with Repetier-Host, and while it's gotten a lot better since I first used it, I moved on to the other two major alternatives, Cura and Kisslicer, pretty quickly. I may be biased, but it seemed that the choice of slicer makes a much bigger impact on delta printers that use a bowden setup, since filament retraction plays a much bigger role. A more intensive, side-by-side pathing comparison similar to the one done by Richrap will need to be done eventually, but my go-to slicer recently has been Kisslicer, even though it's supported by a single developer, who may or may not have gone missing during the second half of last year.
I briefly entertained the idea of extending skeinforge myself and integrating it into Octoprint so that I could slice online, but the sheer magnitude of that endeavor got really scary really fast. However, it seems like that may be the way of the future. Storing and debugging printer settings in the cloud can help shift 3D printers further into black box territory, which is where I think they should be to really take off in the mainstream market. It would also allow for much faster code revision, assuming that there exists a developer who can stomach that task.
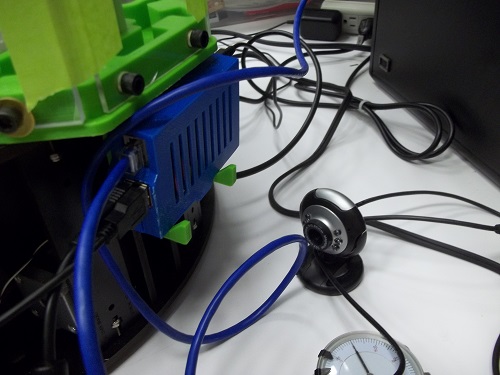
Octoprint and Raspberry Pi
It seems like a lot of the major printer manufacturers (Makerbot especially, with their latest line) have begun adding remote monitoring and control, but luckily for the rest of us, Octoprint makes that functionality trivially accessible. It's a shame that there only seems to be a single developer. Though it's written in Python, its use of Jinja for templating has made it difficult for me to make more than a few simple changes. Luckily, it also comes with a scripting setup for the control panel that makes it straightforward to make some custom shortcuts.
I combined it with a super cheap webcam to monitor my prints and cancel a faulty print from home (my printer stays in lab) if necessary. The timelapse functionality also helped me debug some printing issues, especially as I'm still fine-tuning my magnetic coupling for tool-changing. Offloading the g-code transmission to the Raspberry Pi has also seemed to make my prints more consistent and stable than when I was running Repetier-Host off a laptop. Previously, I had a few cases where the print would just stall mid-print (only with Cura 14.03+, strangely enough). My next step with Octoprint is to try and integrate servo control through RobotBrain and the Pi, allowing me to either add pan-tilt to my webcam or maybe even an automated bed scraper like Dreambox and Botqueue are trying to put together (the latter may be a tad too ambitious).
That said, there are still some shortcomings with the Octoprint-Pi (Octopi) setup. I can't really read/write to the Eeprom easily from the console, so I still do my bed calibrations via a laptop running Repetier or Pronterface. The Pi itself is a tad too slow for me to run the Arduino IDE and recompile firmware directly, though maybe I could remedy that with a lighter OS option (currently running Raspian because it just works straight out of the box). The USB connection between the Pi and the Rostock board is also too slow for me to transfer print files to the SD card and print directly from there. I've read that the Smoothieboards (ie. Azteeg x5) handles this a lot better, and printing directly from the SD card seems to still be the preferred and most reliable way of printing. Most people who have documented their mods online seem to agree that Octoprint is one of the most worthwhile upgrades for any printer, and I certainly agree.
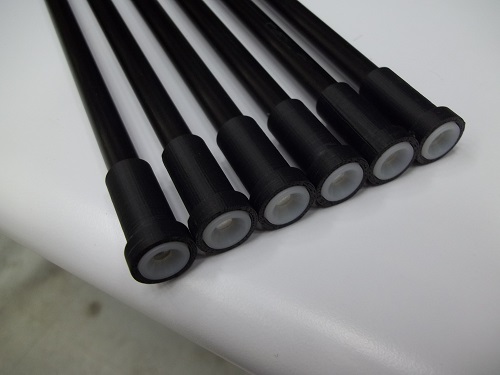
Magnetic Arms
The Rostock design depends on a total of 12 universal joints, and I probably spent an entire day filing and debugging them on the original base kit, without never knowing for sure whether or not I did it correctly. I currently have the xnaron magnetic arm mod installed and may try the Traxxas-style joints in the future. Theoretically, these joints have far less friction than the base design and are much lighter when used in combination with carbon fiber rod arms. I added a nylon countersunk washer to the rod-ends so that the metal spheres could rotate on a nylon surface instead of a 3D-printed one. I also used heat-set inserts instead of threading bolts into 3D-printed parts directly for the carriages and new effector plate. In my opinion, this made the connections more robust and also allowed me to make some minor adjustments later (though I never did).
To be honest, I can't say for sure whether or not this upgrade led to better print quality, but they sure make the system seem much slicker than before. They also made maintenance far easier, since each arm could be easily snapped off, and I can now service the main effector independently. The best feature may be that the whole assembly falls apart during accidental print collisions, minimizing the damage done to the rest of the printer. For someone mod-ing his printer, this was pretty invaluable.
Quick Tool-Change
I'll write about this in much further detail in the future, as my current setup is just the first step towards an automatic, magnetic tool-changer, similar to what was done here in late 2012 and proposed for the Zego Delta Printer. The big limitation I see in 3D printers is the limited number of extruders. Most FDM printers have at most two extruders, with one dedicated to support material. The Kraken from e3d is a four-nozzle solution for hobbyists, but it runs into the issue of leveling and nozzle leakage. If you look at the higher-end, desktop Stratasys printers, the nozzles ride on a pivot to ensure that the unused nozzles are shifted out of the way to avoid collisions. Solutions like the Kraken are also limited to standard filament materials and cannot extrude materials like fluid resins or conductive inks.
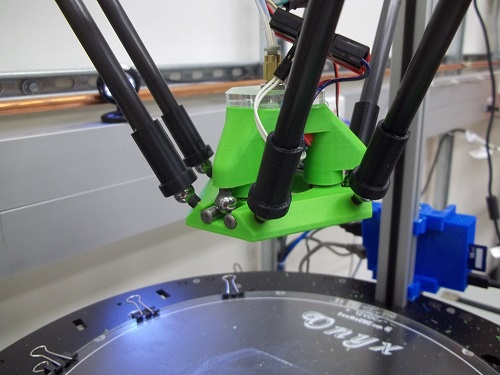
The ability to swap tools would then minimize weight on the effector while maximizing the material selection of the printer. Whether using active (ie. via servo) or passive locking (ie. magnets and effector positioning), precise and repeatable positioning of the tool relative to the effector may be the toughest part. In my opinion, the only correct solution is a kinematic coupling (disclousure: I did my undergraduate thesis in one of the MIT labs that specialized in these couplings). Kinematic couplings ensure exactly 6 points of contacts, no more and no less, producing an exact constraint. Thanks to one of my labmates, we figured out an inexpensive way of making these couplings with a custom 3D-printed effector, steel dowel pins, and the same metal spheres used in the magnetic arm mod.
It took me a few iterations to get the magnetic attraction strong enough to keep the hotend firmly attached throughout long print jobs. Modulating the offset between the steel pins didn't seem to make much of an effect, and my earlier iterations often resulted in the hotend getting stuck in a local minimum when one of the steel spheres would pop out and snag atop one of its two companion pins. The latest revision uses 6 total magnets offset from the sphere-pin contacts, very similar to industrial couplings made by Thorlabs.
Unfortunately, I've been stuck at this phase, as the high magnetic force makes it rather difficult for me to disengage the hotend tooling. The current design allows me to adjust the height offset at the sphere-pin contacts, but I have no way of knowing how much magnetic force is sufficient. Despite that, the current setup at the very least is really nice for easy swapping of tooling. I mainly use it to swap in an analog dial gauge for when I do my bed leveling.

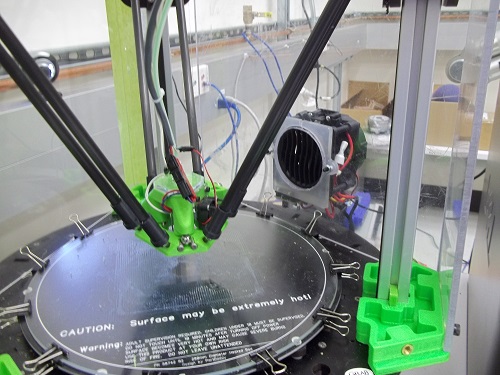
Heated Chamber
The Rostock (and delta printers in general) are often known for having large workspaces, especially in the Z-direction, but cracking in tall prints are fairly prevalent when printing with ABS due to drafts. It was an especially big problem for me, since I keep my printer in lab, where it's a cool 20-21C (68F) at all times. The heated enclosures I've seen documented (1 2) seem to use reflective insulation sheets, and you probably should if you're going for a legit heated chamber similar to the ones on Stratasys and 3D Systems machines. In lab, I measured the interior chamber temperature for the Stratasys FDM 3000, uPrint, and Fortus 250mc at 65C, 88C, and 90C, respectively, in the immediate vicinity of the heat vents. All three machines have pairs of vents blowing inwards from opposing sides, and they all run especially hot mainly to eliminate the need for a heated build plate (I think).
Since the Rostock MAX includes a heated bed, I mainly wanted the enclosure to just eliminate the effects of drafts, and I still wanted full visibility of the print, so I only used 1/4 and 1/8 inch polycarbonate sheets. Instead of enclosing the entire printer, I added attachment pieces to the three main posts and only enclosed the build area. I also moved the extruder stepper motor to the outside of the printer, so that none of the steppers are in the heated environment. I had found some conservative estimates suggesting that it would be dangerous to run steppers in environments with ambient temperature above 50C.
Turns out such caution about overheating was really necessary. With just the heated bed running, I only managed to get the internal ambient temperature up to 25C. For heating elements, I tried both an IR lamp at 250 watts and a small space heater at 200 watts. I hooked both up to an STC-1000 temperature controller, which apparently is a pretty popular temperature controller for homebrewing. The small space heater raised the interior temperature to around 40C, with a high of 45-48C on side of the enclosure directly across from the heater. The temperature could be as high as 65C in the immediate vicinity of the space heater. I don't know if this was just coincidence, but I had two JB-weld joints fail on the side of the effector closest to the heater. It would be unfortunate if the heat contributed to those failures, as then I don't know if I can stick with the magnetic arm mods in combination with future heated chambers. I think I had much better luck with the IR lamp, reaching an average temperature of 42C while conveniently utilizing the empty space above the effector at the top of the interior volume. Placing the heating element there and the temperature controller sensor on the effector itself would also mean that the temperature can adjust according to the layer height, which could be a pretty cool feature. In the end, the enclosure is not as hot as I would have liked, but it has (to date) solved all of my ABS cracking problems for taller prints.